|
Programming Taskbook |
|
|
||
|
Electronic problem book on programming |
||||
|
© M. E. Abramyan (Southern Federal University, Shenzhen MSU-BIT University), 1998–2026 |


|
|
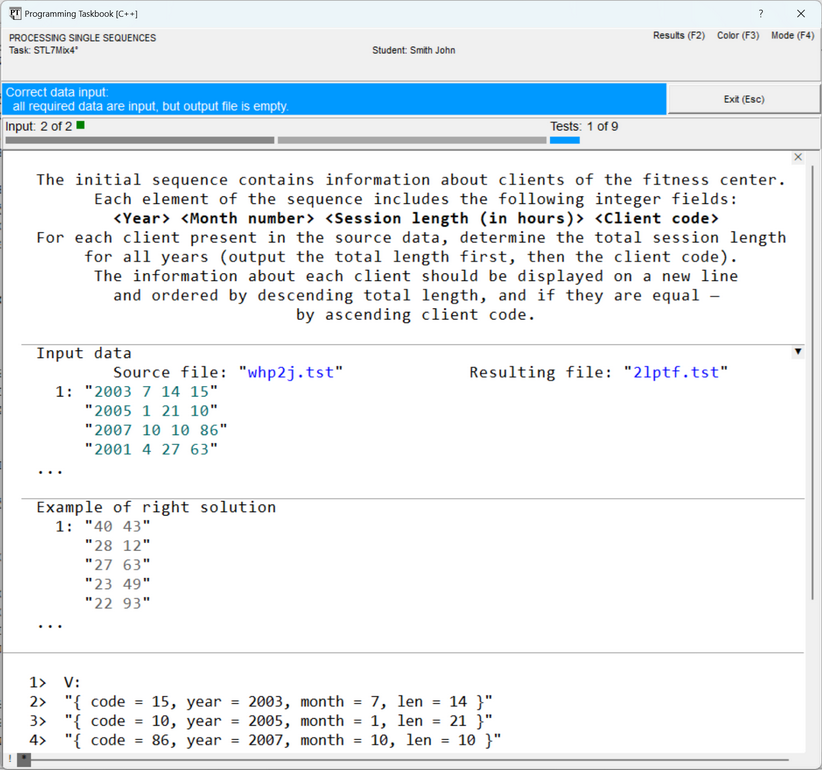
Application of Various C++ Standard Library Facilities: STL7Mix4Creating a Project Template and Getting Acquainted with the Task. Additional Problem Book Window Features for Viewing File DataThe STL7Mix group is the final group included in Programming Taskbook for STL. Each of the previous groups in the problem book is dedicated to a separate part of the standard library: iterators, sequence containers, algorithms, strings, associative containers, function objects. The tasks in the STL7Mix group are designed to develop and consolidate skills in the combined use of various STL library components; when performing them, it is required to independently choose the library facilities that ensure the required result. Another distinguishing feature of the tasks in the last group is the more complex nature of the initial sequences: their elements are records consisting of several fields. These features bring the tasks of the STL7Mix group closer to real-world problems encountered when processing complex data structures. The set of tasks included in the STL7Mix group was previously used in Programming Taskbook for LINQ as the LinqObj group. The Programming Taskbook for LINQ problem book is designed for studying the LINQ technology, available for .NET platform languages (C#, VB.NET, PascalABC.NET) and intended to simplify solving the same tasks for which the STL library was developed, namely, tasks related to sequence processing. Thanks to the matching formulations of the tasks in the STL7Mix and LinqObj groups, they can be used for practical comparative study of both technologies, which will allow for a deeper understanding of their main ideas and features. In particular, one can compare the solutions for tasks STL7Mix4 and LinqObj4 provided in the help systems of these problem books. So, let's turn to task STL7Mix4. This is a relatively simple task related to processing a single sequence. STL7Mix4°. The initial sequence contains information about clients of the fitness center. Each element of the sequence includes the following integer fields: <Year> <Month number> <Session length (in hours)> <Client code> For each client present in the source data, determine the total session length for all years (output the total length first, then the client code). The information about each client should be displayed on a new line and ordered by descending total length, and if they are equal — by ascending client code. The project template for this task, as for any tasks performed using the Programming Taskbook problem book, should be created using the PT4Load software module. After creating this project, automatically launching the Visual Studio environment, and loading the created project into it, the file STL7Mix4.cpp will be displayed on the screen, into which the solution to the task must be entered. Let's provide the contents of this file: #include "pt4.h"
using namespace std;
#include <fstream>
#include <sstream>
#include <iomanip>
#include <algorithm>
#include <vector>
#include <set>
#include <map>
struct Data
{
int code, year, month, len;
operator string()
{
ostringstream os;
os << "{ code = " << code << ", year = " << year
<< ", month = " << month << ", len = " << len << " }";
return os.str();
}
};
istream& operator>>(istream& is, Data& p)
{
return is >> p.year >> p.month >> p.len >> p.code;
}
void Solve()
{
Task("STL7Mix4");
string name1, name2;
pt >> name1 >> name2;
ifstream f1(name1);
vector<Data> V((istream_iterator<Data>(f1)), istream_iterator<Data>());
f1.close();
ShowLine(V.begin(), V.end(), "V: ");
ofstream f2(name2);
f2.close();
}
The templates for the tasks in the STL7Mix group are even more detailed than the templates for the previous groups
of the PT for STL problem book. Recall that the STL1Iter group used the simplest templates containing
the minimally necessary set of Similar goals are pursued by the detailed templates of the STL7Mix group. They not only provide input
of the initial data (stored in external files) but also allow saving this data in a vector,
with each data element represented as a It should be noted that the C++11 standard introduced the possibility of using Having such a template, we can immediately proceed to implement the substantive part of the program:
processing the initial sequence (already available as a vector of type After running the created program template, we will see on the screen the problem book window containing
the task formulation, an example of initial data and correct results, as well as string representations
of all elements of the initial set, output by the
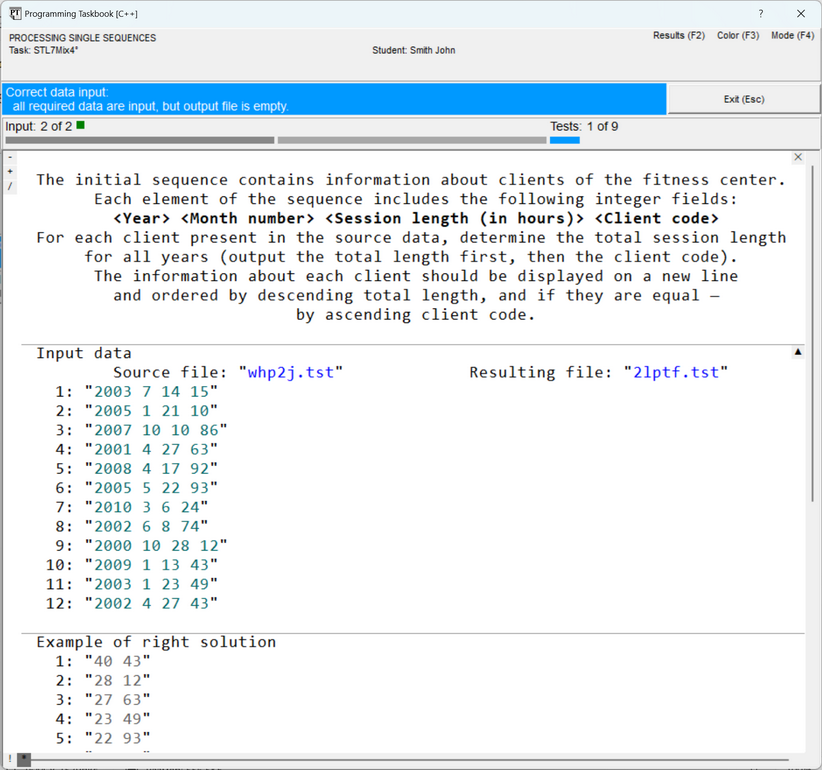
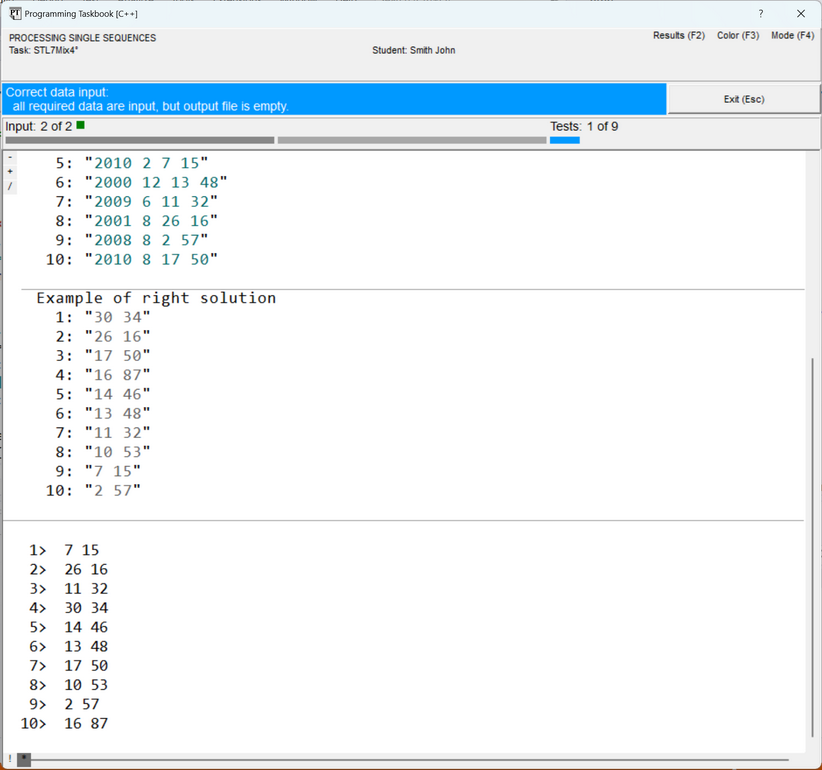
The information panel (light blue) notes that all initial data have been input, and the results file is empty. Thus, everything is ready for implementing the algorithm for processing the initial data. However, before proceeding to the description of the solution process itself, let's recall some capabilities of the problem book window that may be useful when analyzing initial and resulting data presented as large text files. Each line of a text file is enclosed in quotes and displayed on a separate screen line; next to the first line of the file, its sequence number, equal to 1, is indicated. In the initial data and results sections, the file contents are highlighted in a teal color (color highlighting allows distinguishing file lines from other data, as well as from comments). In the section with the correct solution, all data is displayed in gray to distinguish it from the "real" data found by the student's program. The window variant shown in the previous figure corresponds to the abbreviated file data display mode, in which only the initial part of the file's contents is displayed for each file (from one to five lines). The ellipsis (...) placed at the bottom of those sections that display abbreviated data indicates that part of the data is missing. This mode is convenient for initial familiarization with the task, as it allows displaying the contents of all sections in a relatively small window. For a more detailed analysis of the data, as well as when comparing the obtained erroneous results with the example of the correct solution, the full display mode for text file contents should be used. To switch between the abbreviated and full file data display modes, it is sufficient to press the [Ins]
key or double-click the mouse in one of the sections with file data. You can also click on the square marker
that appears in the upper right corner of the initial data section if the window contains file data.
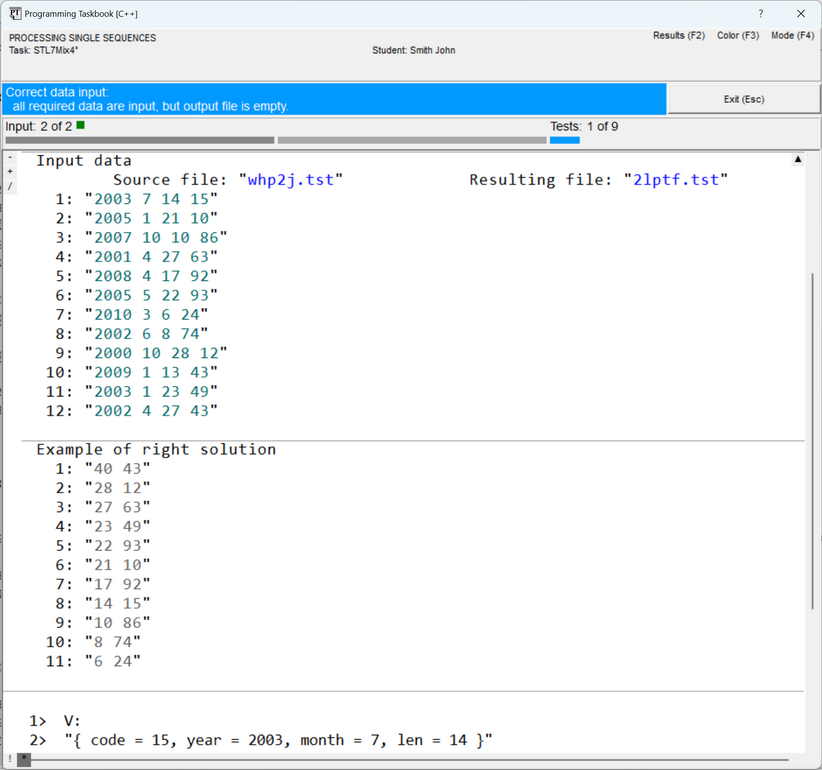
The image on this marker serves as an indicator of the mode: the variant The following figure shows the window view in the full text file display mode. In this mode, the sequence number is indicated before each file line. When the window is closed, the current display mode is remembered and restored in subsequent program runs.
In cases where the window size is insufficient to display all data, the window is equipped with a scroll bar, and, moreover, additional markers are displayed on it (see the previous figure). Scrolling the window contents is easiest to perform using the [Home], [End], [Up], [Down], [PgUp], [PgDn] keys, as well as using the mouse wheel. The group of markers displayed in the upper left corner of the section with the task formulation
is intended for quickly displaying various sections related to the task: clicking on the
Note the Finally, two markers that may appear in the lower left corner of the window should be mentioned.
These are the
Performing the TaskHaving completed the overview of the additional capabilities of the problem book window and familiarized ourselves with task STL7Mix4, let's proceed to perform it. During the processing of the initial sequence (which is already stored in the vector Methods of data grouping based on STL containers were analyzed in detail in the tasks of the STL5Assoc group (see the subgroup "Maps. Data Grouping and Combining", which includes tasks STL5Assoc15–STL5Assoc36). One effective grouping method is based on using a map; it is this method that the note for our task reminds about. Let's define an auxiliary map map<int, int> M; To fill this map, we must iterate through all elements of the vector M[e.code] += e.len; Recall that this statement uses the following feature of the indexing operation for a map: if a map element with the specified key does not exist, it is automatically created, and its value is assigned the default value for the given type (in our case — the number 0). Iterating through the elements of the vector The first of these methods uses the for_each(V.begin(), V.end(), [&M](Data e){M[e.code] += e.len;});
Note the first component of the lambda expression: The second method is even more illustrative; it is based on a special variant of the for (auto e : V)
M[e.code] += e.len;
Instead of the After performing the grouping, it is desirable to review its results. The easiest way is to output
the obtained data to the debug section. To avoid cluttering this section with unnecessary information,
let's remove the for (auto e : M)
{
Show(e.second);
ShowLine(e.first);
}
When running the new version of the program, the contents of the map
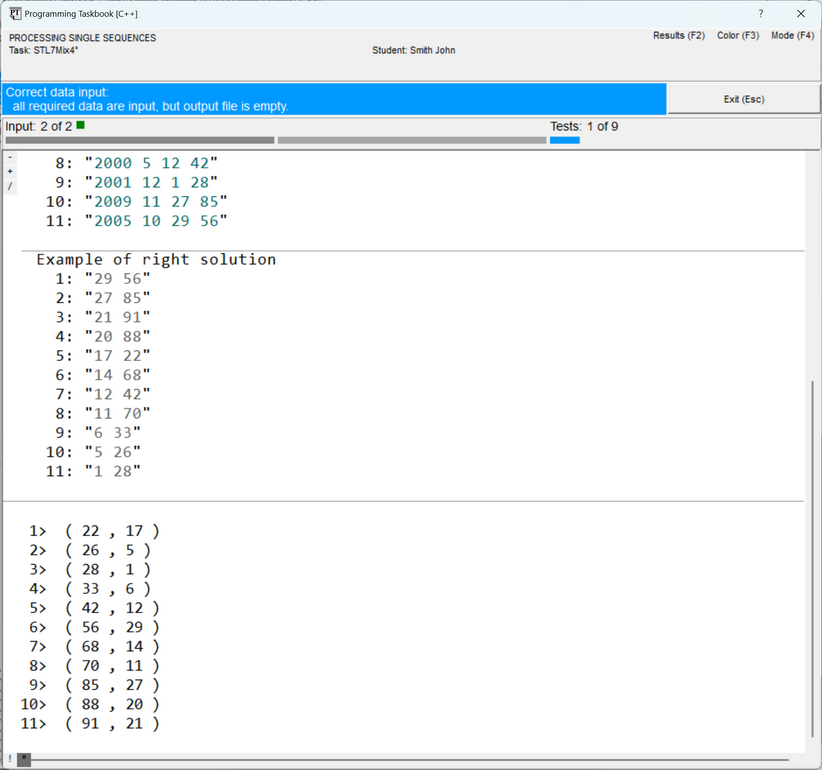
Remark. In version 4.16 of the problem book for C++, additional debugging capabilities
were implemented. In particular, in this version, the ShowLine(M.begin(), M.end()); As a result, the debug data will look as follows (now the first field is output first, and then — the second field, separated by a comma and enclosed in parentheses):
So, we have successfully passed the first stage of solving the task by performing the grouping of the initial data. It remains to sort the obtained data in accordance with the task conditions. Since in the map container the order of elements is fixed and determined by the key values (by default,
elements are arranged in ascending order of keys — see the previous figure), to change the order of elements,
they must be copied into a container for which a sorting algorithm can be used, for example, into a vector The type of elements of the vector typedef pair<int, int> p;
vector<p> V1(M.begin(), M.end());
For the filled vector stable_sort(V1.begin(), V1.end(),
[](p e1, p e2){return e1.second > e2.second;});
This variant of the algorithm sorts the elements in descending order of the second field, and the relative arrangement of elements with equal second fields does not change (due to the stable nature of the sorting). Thus, exactly the order required in the task is ensured: elements are arranged in descending order of the second field (i.e., total session length), and elements with the same second field are arranged in ascending order of the first field (i.e., client code). It remains to output the sorted vector for (auto e : V1)
f2 << e.second << " " << e.first << endl;
After running this version of the program and successfully passing the required nine tests, a message will be displayed that the task has been solved. Let's provide the void Solve()
{
Task("STL7Mix4");
string name1, name2;
pt >> name1 >> name2;
ifstream f1(name1);
vector<Data> V((istream_iterator<Data>(f1)), istream_iterator<Data>());
f1.close();
map<int, int> M;
    for (auto e : V)
        M[e.code] += e.len;
    typedef pair<int, int> p;
    vector<p> V1(M.begin(), M.end());
    stable_sort(V1.begin(), V1.end(),
    [](p e1, p e2){return e1.second > e2.second;});
ofstream f2(name2);
    for (auto e : V1)
        f2 << e.second << " " << e.first << endl;
f2.close();
}
Other Solution VariantsThe solution would be more illustrative if the fields of the vector So, let's describe the following structure: struct Res
{
int code, sumlen;
Res(pair<int, int> p)
{
code = p.first;
sumlen = p.second;
}
bool operator<(Res b) const
{
return this->sumlen > b.sumlen;
}
};
ostream& operator<<(ostream& os, const Res& r)
{
return os << r.sumlen << " " << r.code;
}
In it, besides the two fields, a constructor is defined that allows implicit
conversion of a
Remark. The bool operator<(Res a, Res b)
{
return a.sumlen > b.sumlen;
}
Using the void Solve()
{
Task("STL7Mix4");
string name1, name2;
pt >> name1 >> name2;
ifstream f1(name1);
vector<Data> V((istream_iterator<Data>(f1)), istream_iterator<Data>());
f1.close();
map<int, int> M;
for (auto e : V)
M[e.code] += e.len;
vector<Res> V1(M.begin(), M.end());
stable_sort(V1.begin(), V1.end());
ofstream f2(name2);
for (auto e : V1)
f2 << e << endl;
f2.close();
}
For the ability to fill the vector
Remark. Thanks to the redefinition of the copy(V1.begin(), V1.end(), ostream_iterator<Res>(f2, "\n")); For the operator string()
{
ostringstream os;
os << sumlen << " " << code;
return os.str();
}
This member function must be added to the definition of the for (auto e : V1)
f2 << (string)e << endl;
A similar output variant can be used in the copy(V1.begin(), V1.end(), ostream_iterator<string>(f2, "\n")); Moreover, the presence of the operation for converting the ShowLine(V1.begin(), V1.end());
|
 with the arrow
pointing down denotes the abbreviated display mode (when hovering the mouse over the marker in this case,
the tooltip "Expand contents of the text file (Ins)" is displayed); the variant
with the arrow
pointing down denotes the abbreviated display mode (when hovering the mouse over the marker in this case,
the tooltip "Expand contents of the text file (Ins)" is displayed); the variant  with
the arrow pointing up denotes the full display mode (associated with the tooltip "Collapse contents of the text file (Ins)").
with
the arrow pointing up denotes the full display mode (associated with the tooltip "Collapse contents of the text file (Ins)").
 marker moves to the beginning of the next section (see the next figure), clicking on the
  marker moves to the beginning of the previous section. The sections are cycled through.
The
marker moves to the beginning of the previous section. The sections are cycled through.
The  marker allows switching between the results section and the example of the correct solution
if the window contains both of these sections. Instead of clicking on the indicated markers,
you can press the corresponding key: [+], [–] or [/].
marker allows switching between the results section and the example of the correct solution
if the window contains both of these sections. Instead of clicking on the indicated markers,
you can press the corresponding key: [+], [–] or [/].
 marker that appears in the upper right corner of the section with the task formulation
when a scroll bar is displayed in the window. This marker (and the associated [Del] key) allows hiding
the formulation section, thereby increasing the window area for displaying data from other sections.
Note that the [Del] key allows hiding the formulation section even if the marker is not displayed on the screen.
marker that appears in the upper right corner of the section with the task formulation
when a scroll bar is displayed in the window. This marker (and the associated [Del] key) allows hiding
the formulation section, thereby increasing the window area for displaying data from other sections.
Note that the [Del] key allows hiding the formulation section even if the marker is not displayed on the screen.
 and
and  markers, which allow switching between
multiple pages of the debug section. Recall (see the first figure) that by default,
the debug section displays the string representations of the elements of the initial sequence.
The debug section page on which data is output by the
markers, which allow switching between
multiple pages of the debug section. Recall (see the first figure) that by default,
the debug section displays the string representations of the elements of the initial sequence.
The debug section page on which data is output by the 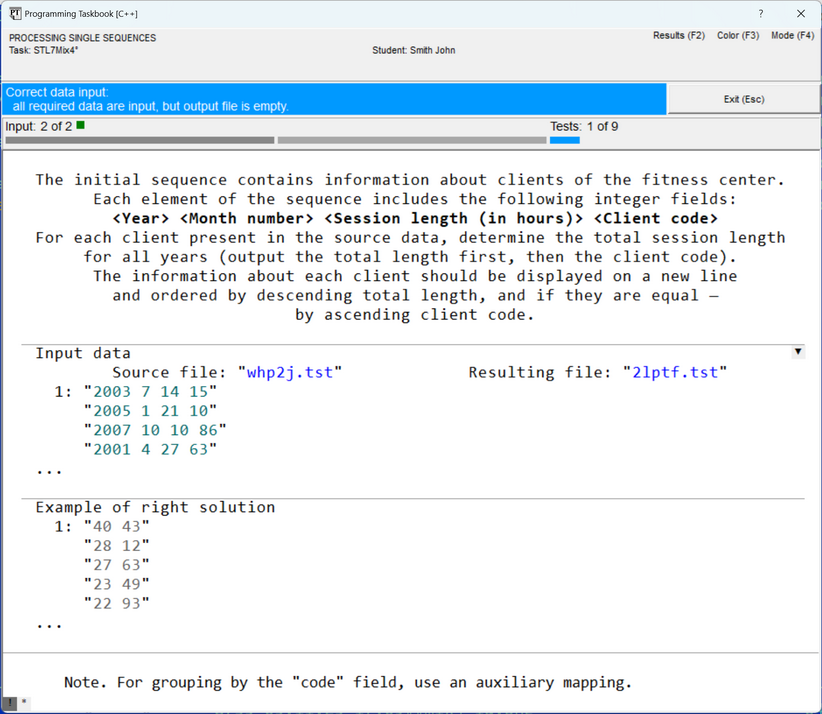
|
|
Designed by |
Last revised: |